Whether you’re having trouble using QuickBooks Desktop for Windows, upgrading to a new version, or experiencing technical difficulties, a clean installation can help resolve several issues and ensure optimal performance. This tutorial will take you step-by-step through the process of installing QuickBooks Desktop cleanly on a Windows computer.

Preparing for Installation:
To guarantee a seamless installation procedure, it’s essential to sufficiently prepare before beginning. The actions you should do to be ready to install QuickBooks Desktop for Windows are broken out in detail below:
Make a backup of your company file:
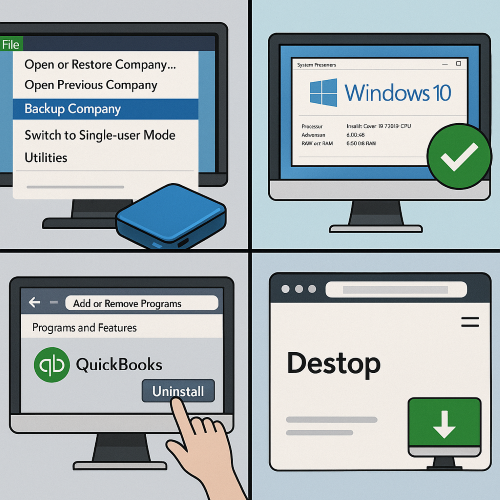
You must create a backup of your business file to guard against any data loss that can occur during installation. You may quickly generate backups with QuickBooks Desktop by using the “File” option. To create a data backup, pick “Backup Company” and follow the instructions. This backup file should be kept in a safe place.
Verify the system requirements.
To guarantee full functioning, your computer must fulfil the system requirements for QuickBooks Desktop. Depending on whatever version of QuickBooks you’re installing, these prerequisites may change. A minimum CPU speed, RAM, disk space, and supported operating systems are examples of standard system requirements. Check to see whether your computer satisfies these criteria by visiting the Intuit website or consulting the documentation that comes with your QuickBooks program.
Remove Previous Iterations:
If you are upgrading from an earlier version, you must remove the prior version of QuickBooks Desktop before installing the new version. By doing this, any conflicts between the older and newer versions are lessened. In order to remove QuickBooks Desktop, open the Control Panel on your computer, choose “Add or Remove Programs” or “Programs and Features,” locate QuickBooks in the installed application list, and then click “Uninstall.”
Downloading QuickBooks Desktop Installer:
If you bought QuickBooks Desktop digitally or via an online store, you will want the installation file from the official Intuit website. Here’s how to download the QuickBooks Desktop installation step-by-step:
Visit the website for Intuit:
Launch a web browser and go to the Intuit official website. You may do this by either simply inputting the URL or typing “Intuit QuickBooks” into the search field.
Log in to your account:
If you have an Intuit account, enter your login information to log in.
Select the Version of Your Product:
Following your selection of the preferred version of QuickBooks Desktop, you can be asked to pick the particular product variation (Pro, Premier, Enterprise, etc.). Choose what best suits your requirements, both personally and professionally.
Launch the Download:
Once the correct product version has been chosen, search for the download button or link. To begin the download process, click on it. The speed of your internet connection will determine how long it takes for the download to finish.
Put the installer file away:
When the download is finished, you’ll be asked to save the installation file to your computer. Select a place on your PC or in your downloads folder where you can quickly find the file. Write down the file name and location for future use.
Installing QuickBooks Desktop:
Now that you’ve finished all the prerequisites and downloaded the installer file, you can start installing QuickBooks Desktop. To install QuickBooks Desktop on your Windows PC, follow these simple steps:
Step 1: Start the installer.
Find the installation file for QuickBooks Desktop that you downloaded in the previous step. You may be requested to confirm that you want to start the installer, depending on your system settings.
Step 2: Welcome Screen
When the installation begins, the welcome screen will appear. This screen displays basic installation process information. To continue, click “Next” or “Continue.”
Step 3: Contract for License:
To proceed with the installation, carefully read the licensing agreement and sign the terms and conditions. Then, you must accept the terms of the licensing agreement. After you accept the agreement, click “Next” or “Continue.”
Step 4: Select the Type of Installation:
There are two installation methods available for QuickBooks Desktop: Express and Custom. Since QuickBooks is installed using default settings, the Express installation option is usually adequate for most people. Nonetheless, you may choose the Custom option if you prefer to alter the installation parameters. Click “Next” or “Continue” after selecting the installation type of your choice.
Step 5: Decide Where to Install It:
Selecting the place for QuickBooks Desktop’s installation on your computer is the next step. QuickBooks will automatically recommend a location depending on your system configuration. You have two options: choose a different directory or accept the default location. Click “Next” or “Continue” after the installation location has been selected.
Step 6: Get the installation going
After confirming your installation options, you may start the installation procedure. To begin installing QuickBooks Desktop on your computer, click “Install.” Depending on the installation choices you choose and the performance of your system, the installation might take a few minutes to finish.
Step 7: Status of Installation:
A progress bar that shows the installation’s current state will appear during the installation process. Please wait until the installation is finished before stopping it or shutting off your computer. You’ll get a confirmation message stating that QuickBooks Desktop has been installed successfully when the installation is complete.
Step 8: Finish the Installation Process
When the installation is finished, your computer may need to be restarted to complete the procedure. To complete the installation, follow any on-screen instructions and, if necessary, restart your computer.
Conclusion
A clean installation of QuickBooks Desktop for Windows can help resolve several issues and ensure the program runs optimally. By installing QuickBooks Desktop, you can efficiently manage your funds by following the instructions in this article and adopting the required safety measures. Please contact Intuit support if you encounter any issues during the installation process.